e-conomic: Export Customer Invoices

Features
- Activate all or specific customers to export customer invoices and credit notes.
- Automatically export posted customer invoices and credit notes to VAN/EDI, PEPPOL, and NemHandel network.
- Export customer invoices and credit notes to specific customers or gateways using API, SFTP, FTP, AS2, email, and other supported channels.
- Data mapping and validation before sending invoices to trading partners.
- Share adaptors with other users within your subscription with advanced security controls.
- Configure positive and negative email notifications for export status and processing results.
- Export customer invoices in real time or schedule exports on an hourly, daily, or weekly basis.
- Monitor invoice/credit note processing statuses and identify errors to simplify troubleshooting and corrective actions.
Configuration flow
Procedure to activate Adaptor e-conomic: Export Customer Invoices
Navigate to Adaptors-> Catalogue, there you can find multiple Adaptors which you can use for business purpose

Click on 'Activate', Adaptor e-conomic: Export Customer Invoices will be activated in your account
After activation of Adaptor it will navigate to 'General' screen of Adaptor
Procedure to configure Adaptor e-conomic: Export Customer Invoices
In General you can manage different settings described in below (General) image

The General tab allows users to configure the basic settings of an adaptor, including its name, description, email configuration, execution status, execution mode, sharing permissions, and security settings.
The following settings are highlighted in the image:
Configure SMTP: Select the default HubBroker email address or an available IMAP/SMTP account. Notification emails and files sent through the destination email gateway will use the selected email configuration.
Status (Active / Inactive): Control whether the adaptor is enabled or disabled.
- Active: The adaptor is enabled and can execute according to its configured schedule (every hour in the illustrated example).
- Inactive: The adaptor is disabled and will not execute.
Execution Mode (Production / Testing): Select how the adaptor processes documents. Production mode is used for normal processing, while Testing mode follows the configured testing behavior, including whether files are sent to their original or processed destinations.
Learn more about sharing and security - Click here
Click on 'Source' to connect e-conomic account with iPaaS, and invoices will be exported from your e-conomic account once it is configured
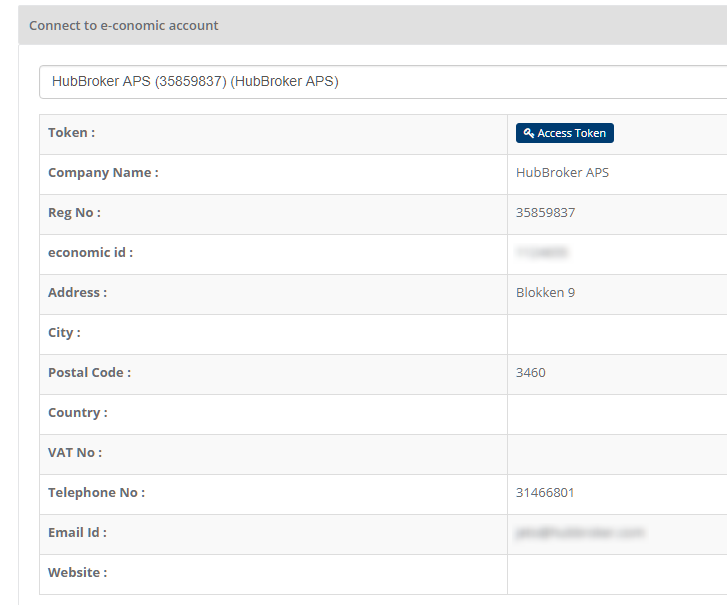
Step by step connection of e-conomic account to iPaaS is shown in below images.
Click on ' + ' to connect new e-conomic account.
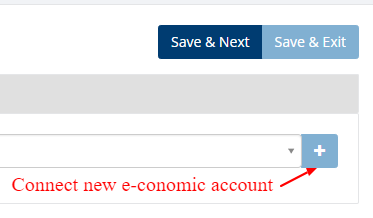
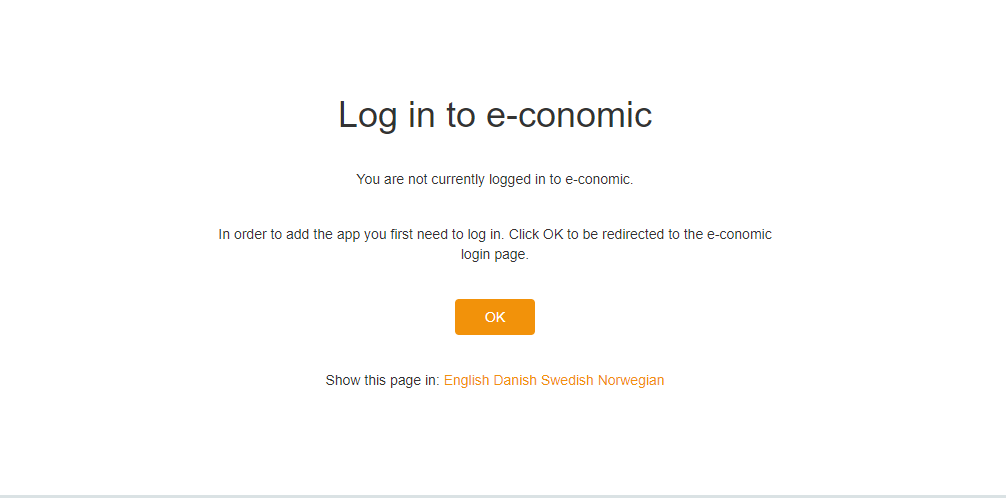
After Click on ' + ' you will redirect to below screen and click on 'OK' button.
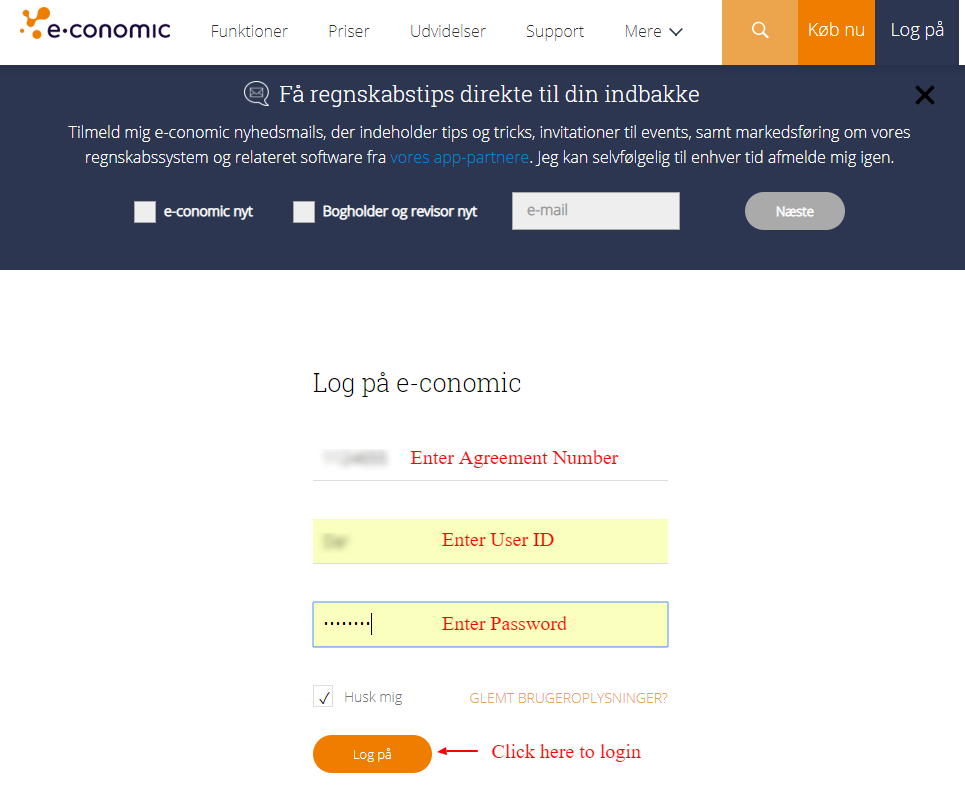
Provide e-conomic agreement number,user id and password and click to 'Sign in'.
After click on 'Sign in' you will navigate to below screen and click on 'Add app' button to connect e-conomic account to iPaaS.
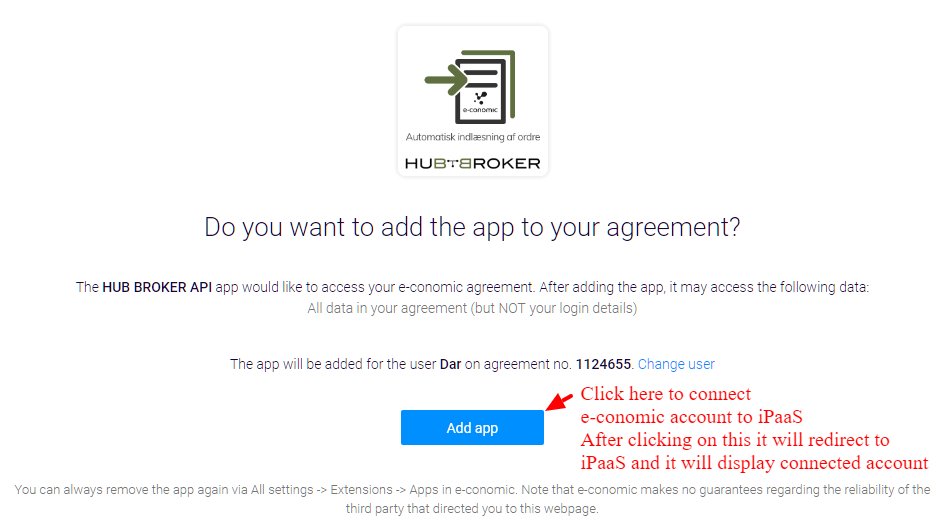
After clicking on 'Add app' it will display connected account.
Click on 'Export Rules' to add settings for customers and supplier
In 'Export Rules', all the customers connected through e-conomic account will be displayed and you can activate all/specific customers for invoices
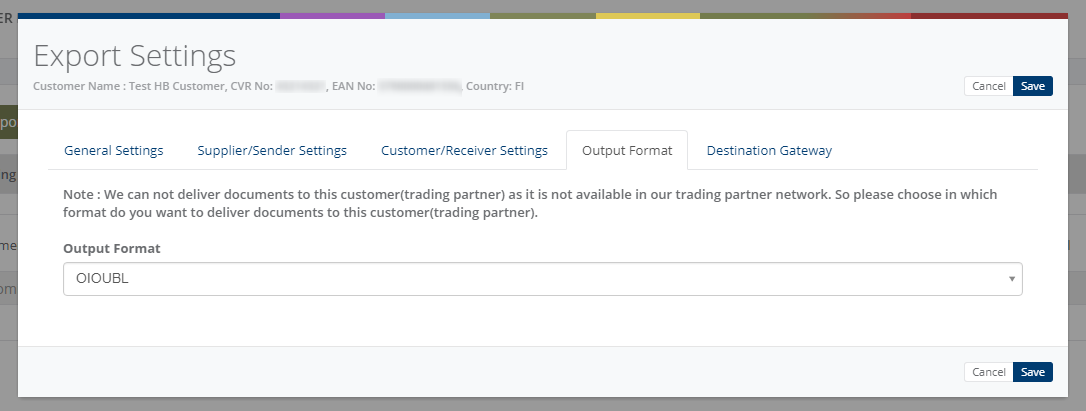
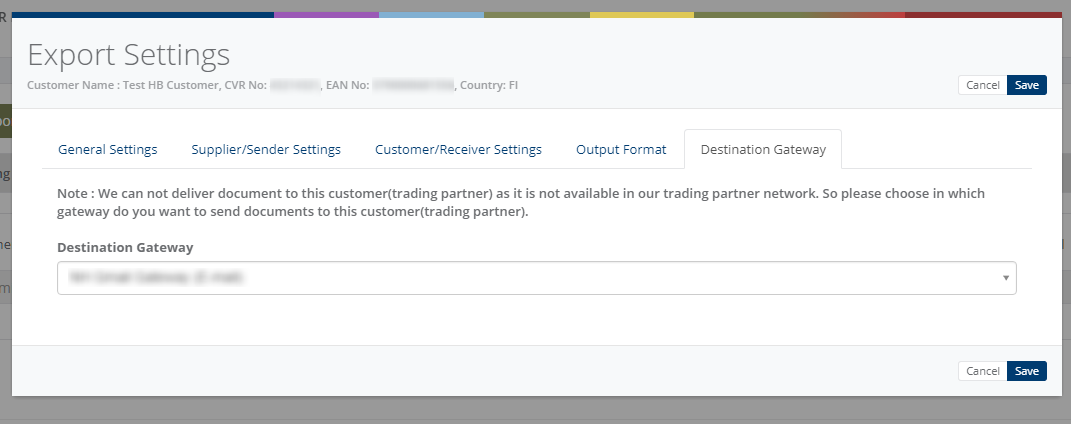
After activation of customers you can change custom settings (General settings, supplier/sender settings, customer/receiver settings, output format, destination gateway) for individual customer


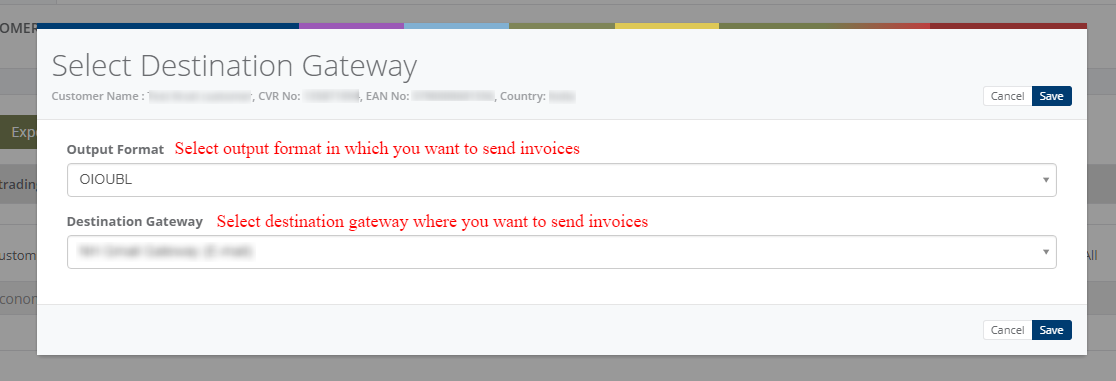
While activation of customer it will ask for the details, where you need to provide output format and destination gateway to identify in which format and where we can send the invoices
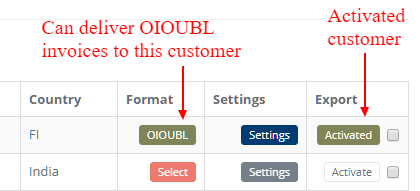
After activation of customer it will be displayed like below (Activated customer) image:
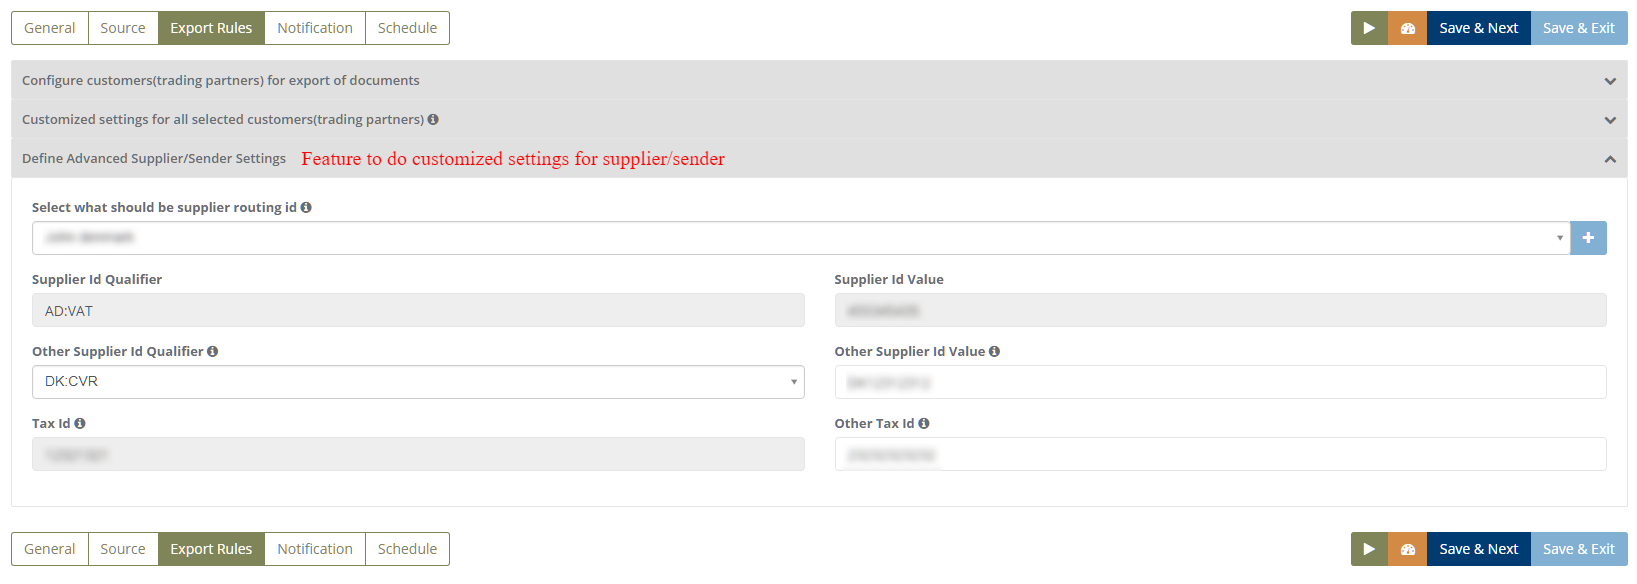
You can define (Common) settings for Supplier/Sender in Adaptor level like displayed in below (Customized settings for supplier - Adaptor level) image and it will be applicable to all the customers
You can do customized (Common) settings for all the selected customers in Adaptor level like displayed in below (Customized settings for customer - Adaptor level) image and it will be applicable to all the customers.
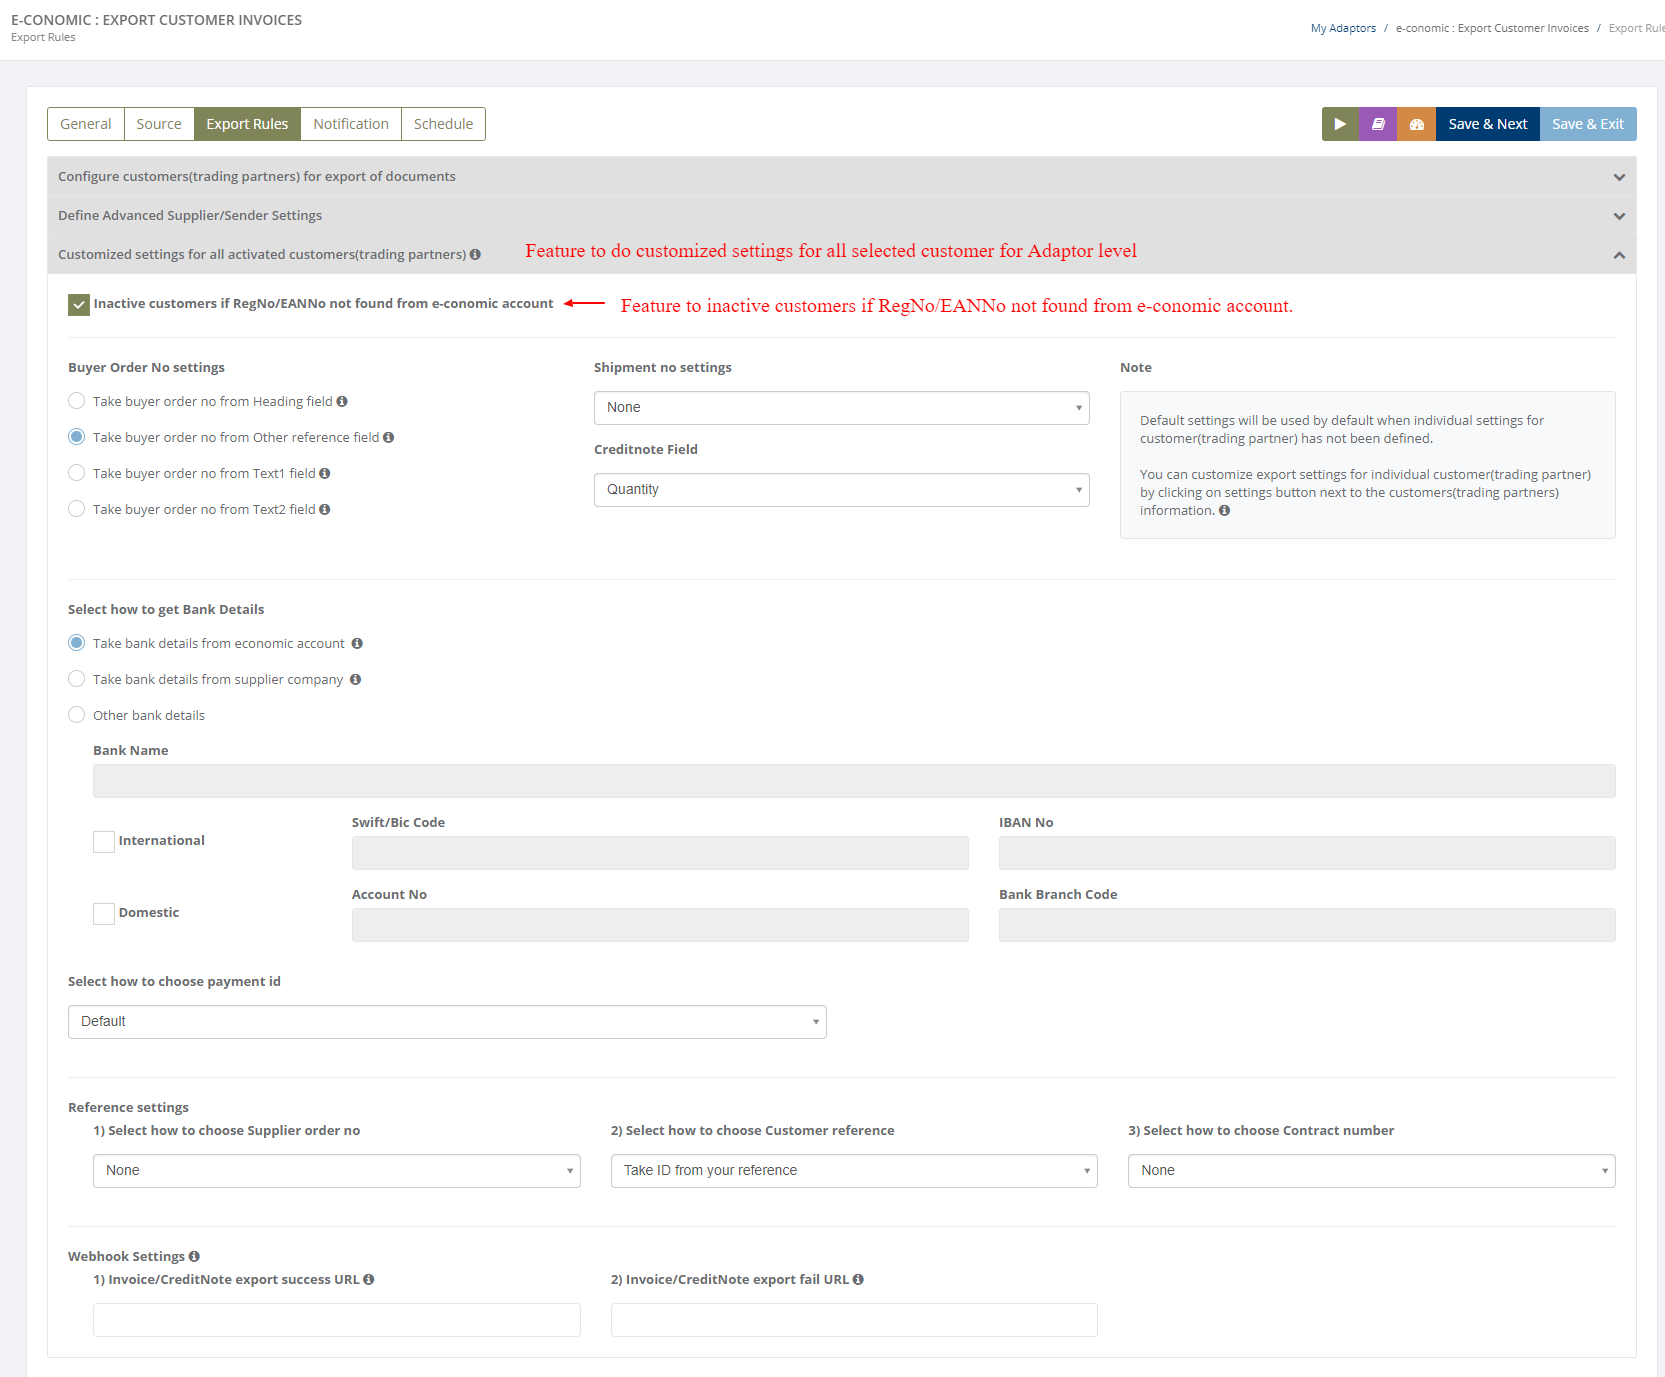
These settings allow users to configure how invoice and credit note information is retrieved from e-conomic and included in exported documents.
Setting | Description |
Inactive Customers if Reg No./EAN No. Not Found | Enable this option to automatically deactivate customers for document export when their Reg number or EAN number is unavailable in e-conomic. |
Buyer Order Number Settings | Configure how the buyer's order number is populated in exported documents. The displayed option retrieves the buyer order number from the Your Reference field. |
Shipment Number Settings | Define how shipment numbers are assigned to exported documents. The displayed configuration uses the seller order number as the shipment number. |
Bank Details | Choose whether bank information is retrieved from the e-conomic invoice, the supplier company details, or manually configured bank information. |
Payment ID Settings | Select how the payment identifier is assigned to exported invoices. The displayed configuration uses the buyer order number as the payment ID. |
Supplier Order Number | Define how the supplier order number is populated. The displayed option is None, meaning no supplier order number source is selected. |
Customer Reference | Specify the source of the customer reference. The displayed configuration retrieves it from the Your Reference field. |
Contract Number | Configure how the contract number is populated. The displayed option is None. |
Validation Settings allows you to set a validation configuration when the destination system or trading partner has specific data requirements.
Webhook Settings allow you to configure URLs that are automatically notified when specific events occur in the iPaaS system, such as invoice or credit note processing.
Validation Settings | Select the validation configuration used to check exported product and price catalog data against defined requirements. The currently selected option is None, indicating that no validation configuration is selected. |
Edit Validation | Use the yellow edit button next to the validation dropdown to access the available validation configuration options. |
Webhook Settings | Configure webhooks to automatically notify an external system when specific events occur in iPaaS. The system sends an HTTP POST request to the configured webhook URL when the relevant event is triggered. |
Invoice/CreditNote Export Success URL | Specify the URL that should be notified when an Invoice or Credit Note is successfully exported. |
Invoice/CreditNote Export Fail URL | Specify the URL that should be notified when an Invoice or Credit Note export fails. |
Webhook Notification | When a configured event occurs, iPaaS sends the relevant event information to the specified URL through an HTTP POST request, allowing the external system to take further action automatically. |
Custom settings for particular customer
You can change below settings for individual customer
- General settings
- Supplier/Sender settings
- Customer/Receiver settings
- Output Format
- Destination Gateway


Notification settings
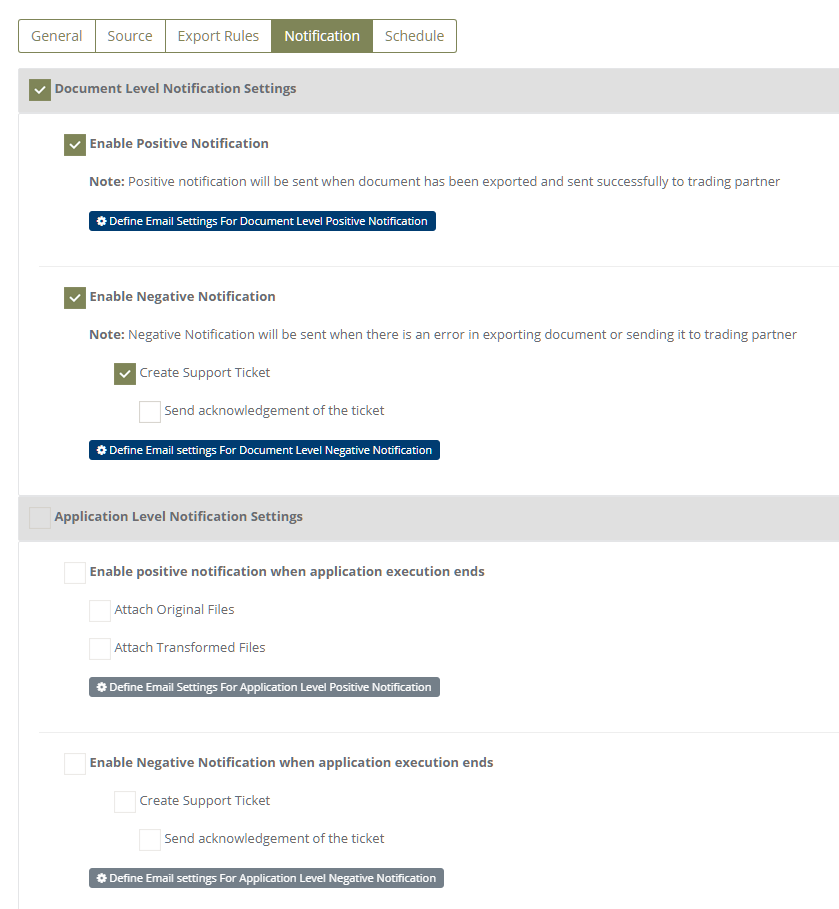
You can enable/disable the notification settings according to needs.
Notification settings categorized into 2 sections:
1. Document level notification settings
- Enable positive notification will be sent when document has been exported and sent successfully to trading partner
- Enable negative notification will be sent when there is an error in exporting document or sending it to trading partner
2. Application level notification settings
- Enable positive notification for getting email alert when application executed successfully.
- Enable negative notification for getting email alert when execution of appilcation is failed.
Schedule settings
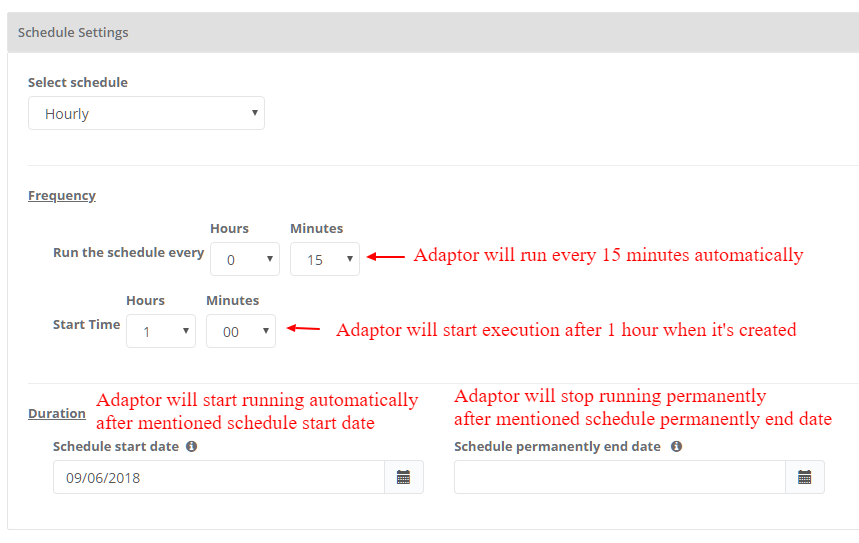
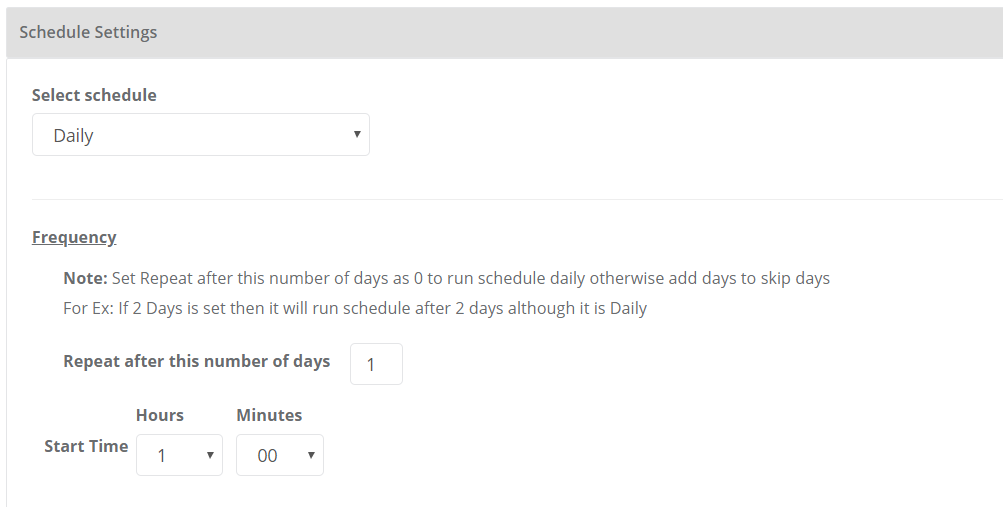
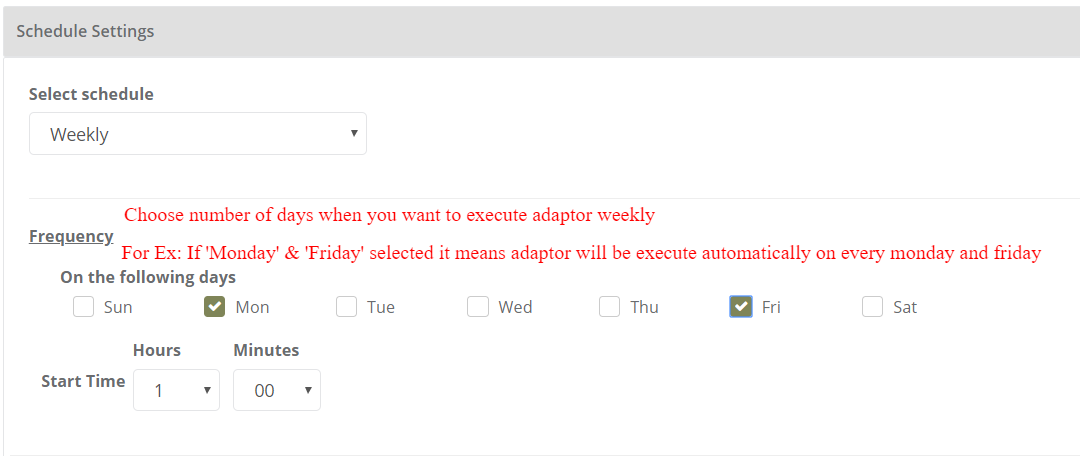
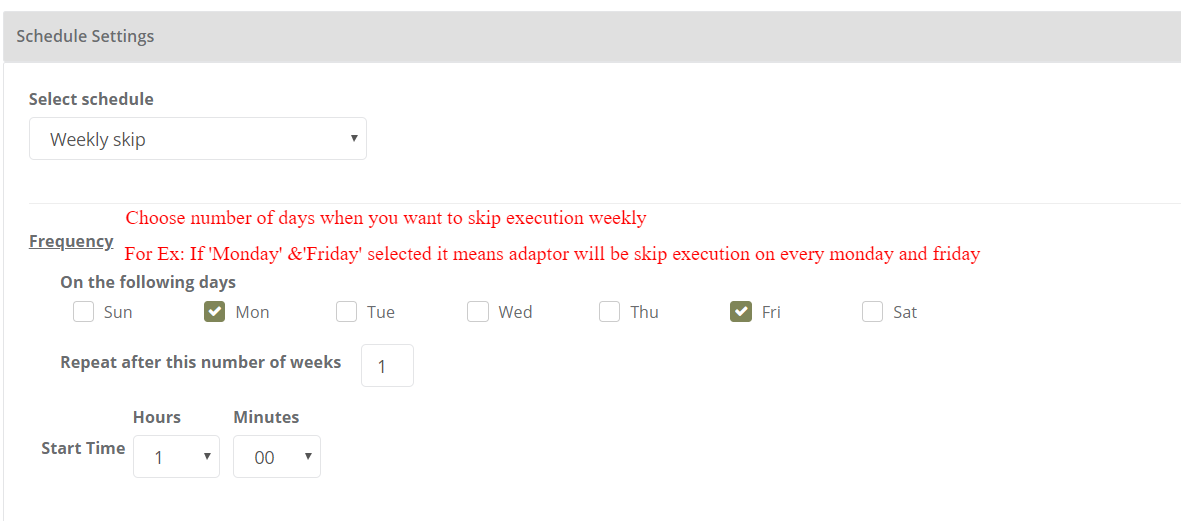
You can set schedule for Adaptor when you want to be run the Adaptor automatically
Adaptor support 7 types of schedule.
1. Hourly
2. Daily
3. Weekly
4. Weekly skip
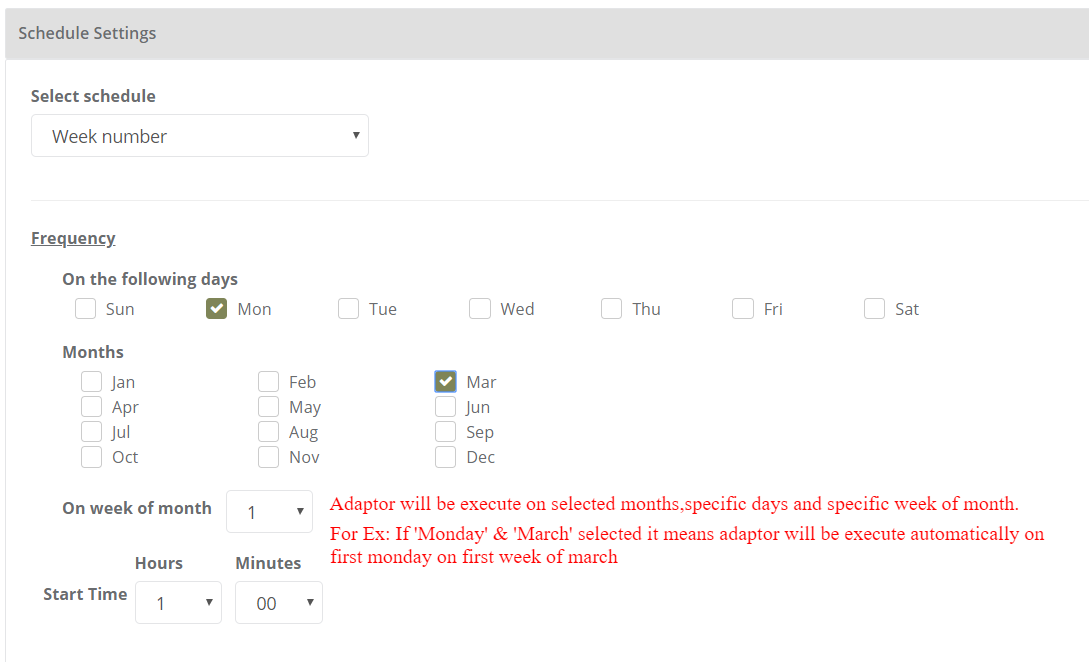
5. Week number
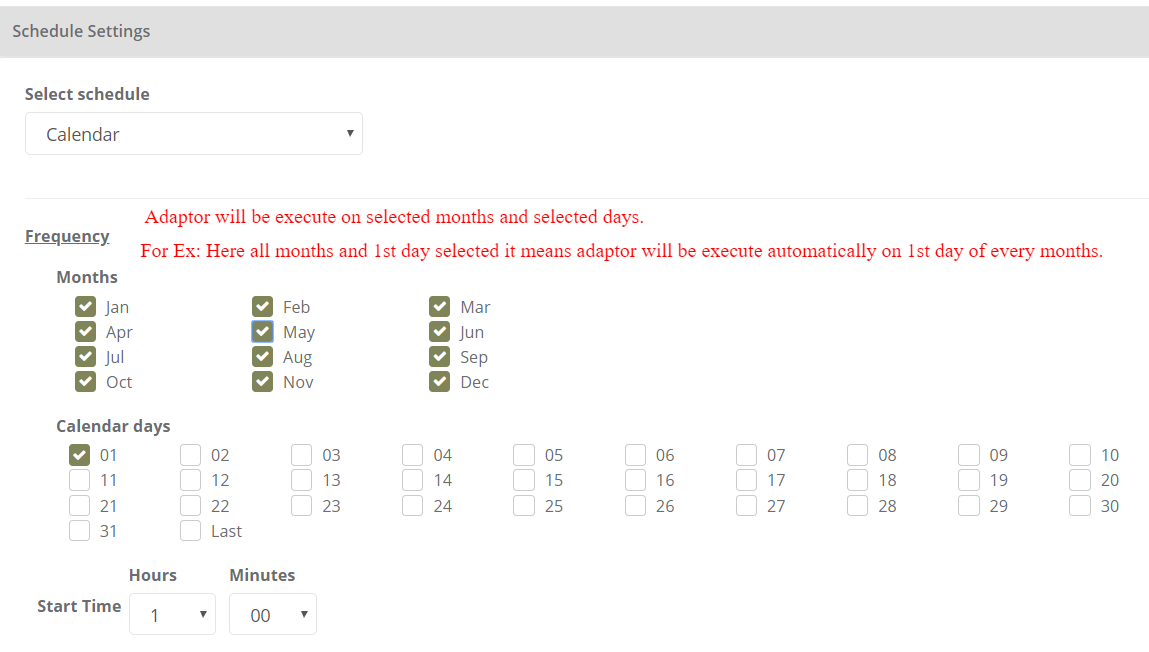
6. Calendar
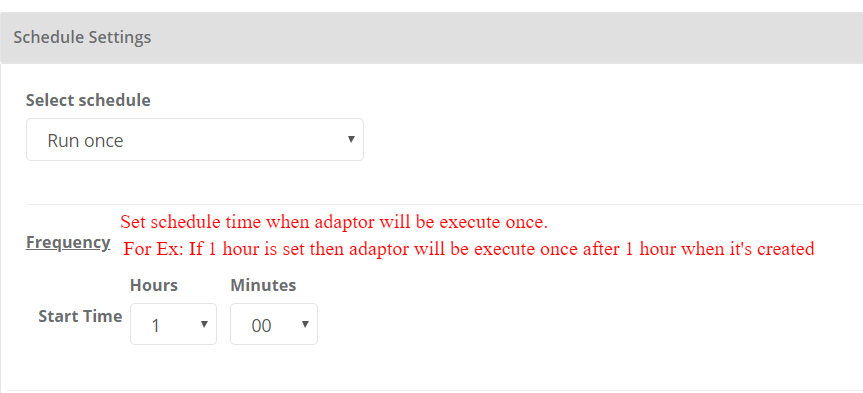
7. Run once
Dashboard
You can view all the transactions of Adaptor through Dashboard
You can view all the details of exported documents like sender, receiver, document number, customer order number, supplier order number and status
You can view PDF and XML file of invoices which are exported and successfully processed into destination gateway

Click on 'Manually Export Invoices' and you can manually export multiple invoices to the customer with the facility By Invoices , By Customer and By Date.
1. Search by invoices
2.Search by customer

3. Search by date
Click on 'Find Invoices' and you get the list of Not Activated, Not Exported and Already Exported invoices.
Category: Adaptor
Last date of update: 26.10.2026
